Thursday, 30 June 2016

Steps to Import .docx in Your WordPress Blog


There are a lot of people who like to write in Microsoft Word rather than writing on the WordPress editor directly. Moreover, those who wish to import the .docx document in their WordPress and do not wish to copy or paste the document makes the formatting quite bad.

Moreover, with the amount of blogs that we need to put in to the website we can say that  We do certainly need a professional WordPress developer for technical task, but here i have put in efforts to make you understand the process of importing. In this blog, we will discuss how to import the .docx documents in a WordPress website without botching up with the formatting. 

Converting Docx to WordPress

Make sure to import properly .docx Files in your WordPress website. There are several users that prefer to write down their articles that are present in Microsoft Word that offer an inbuilt thesaurus, spell check,  styles, templates, and formatting.

Wherein, WordPress's default visual editor do not offer all these features. Moreover, guest blogging is another possible usage scenario which is required for the development.

There are various publishers that do not want to give guest writers access to the admin area of their WordPress; then they have to receive their guest posts either using the normal HTML as well as a .docx document.

At the end of this, you might require already have some content which is saved in .docx documents. Now the next step if Copying, as well as pasting from the docx file, will be a little difficult, especially if you need to copy the content from more than one document.

Keeping this in mind let us see how one can properly import .docx documents in their WordPress without breaking the formatting.

The next step is to Import .docx Documents in your WordPress

The very first thing you need to do is install and activate the Mammoth .docx which is a converter plugin. Make sure that you know the step by step guide on how to install a plugin. 

After activation, make sure that you create a new post or one can even edit a new one. Looking at the edit screen, you will get the Mammoth .docx converter meta box which is present below the editor.

Use the Mammoth docx converter for your WordPress

All you need to do is click on the choose file button so as to select the .docx file which is needed in the computer. After selecting the .docx file, the plugin will depict the three views for the documents.

In the Visual tab, it will help you see the document on your WordPress website. You will notice that it will ignore any styles applied to your .docx documents such as background color, text color, margin, padding, etc.

Rather than this, it will allow your theme’s stylesheet to control the display items on your screen. 

This also allows you to view the HTML, which was generated by the converter, and this can be done by just clicking on the button that says Raw HTML. Make sure to click on the messages button in order to check out any warnings or errors that one gets on the conversion.

You can check the look of the documents, and if you are satisfied with the way how the document appears in the visual tab, then it allows you to click on the ‘Insert into editor’ button. The plugin will allow you to insert you converted HTML in the post editor of your WordPress post.

Now you can keep on working on the post.
Wednesday, 15 June 2016

Applying Conditions to Menu For WooCommerce Subscribers


Have you been planning on starting up a WordPress powered membership site? Well, then you might have heard of the difficulties associated with creating membership sites with WordPress. Thankfully, building a membership site using WooCommerce can make the task considerably easier.

But remember, once you've created a membership site it's imperative that everything on your site oozes exclusivity for your logged-in users or WooCommerce subscribers. Thankfully, many plugins are available online that renders the ability to control the pages or portions of your website content that you want to show to active subscribers and hide from inactive subscribers.

Understanding the need to show/hide menu items


Of course, if you don't want certain pages to be accessed by non-members (or non-logged in users), you won't want those pages to be displayed in your site's navigation menu as well. Likewise, there will be some pages that might not be of much use to members. For instance, the pages that sell WooCommerce subscription products and/or services to guests aren't useful for active subscribers. And so, it's better to keep such pages hidden from the subscribers.
In essence, for a membership site, you should consider adding conditional logic to show or hide menu items based on user role. After all, it isn't a good practice to make your members (or active subscribers) shuffle around the content every time they visit your site. Rather, you should make it easy for your members to find quickly the features and services they've signed up for. In short, you must make your site's navigation menu more member focused.

So, what's the solution?

This is where the “If Menu” plugin comes in handy. The plugin helps in controlling the navigation menus for members. Through this tutorial, I'll help you learn how you can create a menu adjusted for your active WooCommerce subscribers. Also, you'll get to know about the plugin and how it can be used to determine whether a subscriber has an active or inactive subscription. In reference to this post, we'll be using the following two plugins:

  • If menu plugin
  • WooCommerce Subscriptions

Note: Before proceeding with the process of using both of the above mentioned plugins, make sure that they're installed on your site.

Let's get started

For adding conditional logic to menu items you'll need to configure:

  • Active or inactive roles of your WooCoomerce subscribers.
  • Menu items for members (i.e. active subscribers)
  • Menu items for guests (i.e. non-logged in users)

A list of sample memberships included in the image.


Let us now have a detailed overview of all the above listed key points one by one:


Step 1 – Configuring Active / Inactive Roles of WooCommerce Subscribers

Before you configure the menu items for your WooCommerce subscribers, you'll first need to set up the roles of active or inactive subscribers. For this purpose, click on the WooCommerce option from your WP admin navigation menu. Next, click on the Subscriptions tab, and from here set up the active/inactive subscribers roles.

Bear in mind; active subscribers are assigned the “Subscriber” role, and inactive subscribers are assigned the “Customer” role by default as shown in the below image:


Note: You can also choose to set up custom roles for your subscribers, by using WordPress plugins such as User Role Editor.

Keep in mind that the roles we'll assign to active and inactive subscribers will help us in showing or hiding certain menu items.

Step 2 – Configuring Menu Items for Active WooCommerce Subscribers

So, now that you have set up the roles of active (and inactive) WooCommerce subscribers, next you need to decide which menu item you would like to show to your active subscribers. Here, we'll need to make use of the If Menu plugin.

The 'If Menu' plugin lets you show/hide your website primary navigation menu items on the basis of conditional statements, such as user roles, whether a user is logged-in or not, etc. But, to make use of the plugin, you'll first have to make sure that the plugin is enabled.

As soon as the plugin gets enabled, a new checkbox option labeled “Enable Conditional Logic” will be added to each menu item. For this, go to Appearance → Menus, and from there you can start making edits to your navigation menus.

Next, click on any of navigation menu item and then make the ‘Enable Conditional Logic’ checkbox checked. And then, you just need to select whether you would want to show or hide the selected menu item. You will then need to choose any one of the corresponding conditions from the drop down box.

Since we need to show particular menu item just to your active subscribers, we have to choose to show the “Subscriber-only” page link only if “User is Subscriber”:

Once you have selected a condition, just hit the “Save Menu” button.

Step 3 – Configuring Menu Items For Non-Logged in Users

In this section, we'll talk about the process of showing your menu items to guests (or non-logged in users) of your membership website. To do so, you just need to click on the “Hide” option if the corresponding condition is set to “User is logged in.”

Click here, to get more information about subscription


Wrapping Up

Apart from making your membership website pages or part of the content to members, you should also consider adjusting the navigation menu items based on user statuses. Doing so will save the time and efforts of your active subscribers directly shuffle through the useful pages that can be accessed by them. Likewise, you don't necessarily need to show the pages that cannot be accessed by guests or inactive subscribers.

Hope this post will guide you in controlling the navigation menu items of your WordPress membership site with utmost efficiency.

Thursday, 2 June 2016

Subscribers aren't enough. Who is reading your Blog?


Well, that's not enough if you own a blog and publishing content on regular intervals. Understanding your audience and keeping a check on them regularly is a crucial step to success. It assists in learning and helps to find out which blog page are very popular among the users. How do the users land on those blog pages? And what else entertained the user?

Undoubtedly, blogging is a huge pond for bloggers to dive. And WordPress is a significant platform to reach millions of audiences across the globe. So here in this article, we shall discuss how to find out who reads your blog and who are the subscribers to your WordPress blog.

Understanding about Google Analytics

Google Analytics is a freemium web analytics service which is offered by the tech giant, Google. It tracks the visitor's site and reports about RSS feed subscribers. First, one is required to visit the Google Analytics websites and signup for an account.

Setting up Google Analytics for WordPress using MonsterInsights

To set up this MonsterInsights plugin you do not need to hire a WordPress developer for it. It is a simple and a quick procedure for the same. And if you've already installed this plugin then you may skip this step.

After installing the plugin, you need to install and activate the Google Analytics by MonsterInsights plugin. Here is a simple guide to building a WordPress plugin.

At the time of activation, you need to visit Insights > Settings page and click on ‘Authenticate with your Google account’ button. It will open a dialog box which will ask you to give permission to the Google Analytics plugins to access the users Google account. You may proceed by clicking the allow button.

Once you are done with this, the plugin will now fetch your account settings from your Google Analytics account. Now you need to select your analytics profile by clicking on select a profile. You may now click to save the changes icon to save your settings.

How to track RSS Links in Google Analytics

In addition to tracking visitors on your website, Google Analytics can also track links to your website from other sources like your RSS feed, email newsletter, social links, etc.

You can add your URL parameters in case you're sharing links manually. Although WordPress automatically generates the links in your RSS feed and newsletter.

You may track your RSS feed links using the Google Analytics by MonsterInsights plugin in WordPress. You may proceed with the following procedure.

To visit the Settings click on to Analytics > Settings in the WordPress admin section and click on the Advanced tab. Check the box next to ‘Tag links in RSS feed with campaign variables’ option and click on the save changes button.

That's all!

Find the subscriber Information

The first major step to find subscriber information is to give your users the ability to subscribe to your blog through an email newsletter. The two primary email marketing platform among our users are MailChimp and AWeber. Both of the subscribers come with its own built-in analytics.

I hope this blog has helped you find who reads and subscribes to your WordPress blog.


Friday, 27 May 2016

Factors to Consider before choosing a WordPress Plugin


WordPress plugins are useful tools that help in extending the functionality of a website or blog. However, with over 37,000 plugins available in the WordPress Plugin Repository, choosing the most suitable ones for your site can be overwhelming and challenging no matter whether you're a beginner or an experienced usee.


In this post, I'll share you with some important aspects that you should consider when choosing a WordPress plugin for your website.

Before Proceeding Further


Remember when you're searching for a plugin, make sure to jot down all your requirements about what you want a plugin to do. In essence, create a checklist containing a set of features that you're seeking in a plugin. Not to mention, choose a plugin that offers features to meet your exact website needs.

You don't necessarily have to choose just one plugin that can do all the work for you. Instead, you can consider installing 2 or more plugins if they together can facilitate you with the desired features. But, avoid installing too many (and unwanted) plugins in your website.

You can easily search for the plugin in the WordPress plugin directory. The plugin directory comes with thousands of free plugins. The official plugin directory looks something like:

As you can see in the above image, you can find all the featured plugins as you scroll down the page. You can also easily find the most popular plugin options, by clicking on the “Popular” tab and so on. Being able to find free to use plugins from one single destination is indeed good for beginners, but the overwhelming number of plugins makes it difficult to pick the best plugin.

Now, let's move ahead to understanding some key aspects to choose the best WP plugin worth considering.

Key Aspects For Selecting a WordPress Plugin Worth Exploring


The best way to know which plugin you should download for your website is to compare the plugins based on information like ratings, reviews, compatibility, etc. In this section, we'll be talking about some of the most important factors you should take into account to decide which plugin will best suit your needs. 

1. Do not scour over the net to get your desired plugin.

Yes, you heard that right! Most of the WordPress users have a habit of scouring the net to learn about the best WP plugins. But, amidst thousands of search results, finding an appropriate plugin for your site can be a tedious process. Instead, one best way to find a good plugin is to know if any bugs are found in a plugin (especially the one you would like to use for your site). To do so, simply head to the plugin's support page on wordpress.org.

The support page for the plugin won't only show the bugs that have been reported by other plugin users, but will also help answer your queries (if any) relating to a WordPress plugin.

2. Be wary of using disallowed plugins.

While a plugin does help in extending a site's functionality, there are a few plugins that can slow down your site because of using excess resources. These kind of plugins are banned from being used on sites. You can know about such plugins, by looking at the WP Engine list of disallowed plugins.

Make sure not use any plugins on the list, as they're banned since WP Engine provides all of the features (offered by different plugins) themselves like caching, creating backups, etc.

3. Consider using plugins of well-established contributors.

Lastly, it's worth looking at who developed the plugin you want to install on your site. Check out if the plugin author is a well-established member of the WordPress community or not. In addition, do make sure if the plugin creator is a contributor to the WordPress core, have they authored other well-regarded plugins and so on. You can find the profile of plugin authors in the WordPress.org plugin repository.

4. How many times a plugin has been downloaded?

The first thing you should consider when choosing a plugin is the number of times it has been downloaded (also referred to as active installs). The more a plugin will be downloaded, the more popular it will be. A popular plugin is the one that best fit users' needs, is well-maintained by its developer, have fewer or no issues and works well compared to the plugins that are downloaded only a few times. 

For example, as you can see when the two shortcode generator plugins, i.e. Shortcodes Ultimate and Easy Bootstrap Shortcode are compared based on the number of downloads, the former one with 4 lakh active installs beat the second plugin with 40 thousand active installs. 

5. Which plugin has a good user rating?

Another key factor that will help you decide which plugin is better compared to other available options in the similar category is to check out the Plugin Ratings give by users. The classic star rating of 1 out of 5 stars is used to rate a plugin; the plugin getting 5 out of 5 stars is the most popular and high-quality plugin. It is advised that you should avoid using a plugin having a low rating (ideally less than 3-star rating) unless it's a new plugin that is yet to be explored by users.

You can check a plugin's rating from the main plugin directory window, as shown in the screen shot below:

Also, you can view the rating of a plugin given by users by opening a plugin page:

6. Which WordPress version the plugin supports?


Not all the plugins will support the latest version of the WordPress platform. And so, make sure that the plugin you want to use is compatible with your WordPress website. In case, the selected plugin does not work on the latest or old version of your website, then it won't possibly work on your WP site's version.

You can know about whether a plugin will work well on your website version or not, by checking out the “Requires WordPress version“ option given in the sidebar section of a plugin page:

7. Read user reviews on a plugin.

One clear way to determine if a plugin can help meet your website needs or not, is to read about users' experiences about the plugin. Reading user reviews regarding a plugin will make you understand things like how a plugin helps in solving an issue or what kind of functionality it adds to a WordPress install.


Final Words

Through this post, I've tried to cover the most crucial aspects that you should consider when you're about to select a plugin for your WordPress site. You can decide on choosing a plugin by viewing the times a plugin has been downloaded, or by seeing the ratings and reviews given by other WP users. Though the above discussed factors might not help you in choosing 100 percent perfect plugin for your site, but will definitely let you make an informed decision.

Note: Avoid choosing a plugin that hasn't been updated since a long time.

Friday, 6 May 2016

Need of Custom PSD to WordPress Coding


When you are about to enter into the web development world to take your business on mobile you need to remember that crux of developing an incredible website , which is: Firstly, make the design interface attractive yet not a maze for the users. Secondly, make sure that the code for your website is quite functional and efficient.


Both these components work in together to render an incredible websites and one is incomplete without the other and you cannot cut slack in any of the two if you want to have a good website.

May people think that creating a good web design is a matter of sheer technical expert but it is quite an artistic job which requires great creative acumen which is quite a rare species;


However the other phase of web design which is converting it into intuitive web enabled components require you to have brilliant coding skills and a strong grasp on web languages such as HTML, PHP, CSS and JavaScript.


This brings to us the conclusion that creating a PSD image of your design is quite an easy but technically coding it into a workable and functional website is an arduous task.


WordPress is a blessing for those who do not have a good hand at programming, being an open source community has gifted or, an open source tool for developing websites quickly and is quite an effective content management system which is great user friendly quotient and can be used efficiently to create a quality website.


Though it is quite easy, but you need to focus on WordPress web development process as it is no cake walk to create a custom website. Those who are not sure about how to go about the process of PSD to WordPress Conversion can read along to get a lucid picture:


Step 1: Slice your PSD images


The process of PSD to WordPress conversion begins with slicing. Slicing implies cutting and dividing the design file of an image into several small files designs in which they will have different component of the holistic design. This process holds quite an important as no one can code the complete design in one single image. One single web design is a unit that comprises of multiple images interviewer seamlessly, and each and every component and design feature render a purpose and functionality of its own.


Step 2: Style.css and Index.html


Following that step is the coding process in which the sliced images are coded into HTML or XHTML web format and designers use CSS to style them. For this process the designers need to have strong hold on languages such as CSS and HTML.


To accomplish this purpose developers make softwares such as Fireworks and Dreamweaver, which are developed to create websites, however on top of it, it is totally dependent on the programmer what they prefer to use.


Step 3: Creating WordPress Theme


When it comes to the process of developing a WordPress website it is actually converting the WordPress theme which is then uploaded into a WordPress software.


Which means the prime focus of converting a PSD image to WordPress process implies to create a PSD image into a WordPress theme and then after making it functional using the tools and plugins to make it a fully functional website.


Thus in order to develop an extremely intelligent WordPress website, you need to design your basic HTML file as per the basic file structure of WordPress theme’s and then breaking down your HTML file into multiple HTML files that fits into the structure of the file.


WordPress comprises of several PHP files for instance Header.php,archive.php, Index.php, Footer.php, page.php, single.php, category.php,Sidebar.php, 404.php, search.php, comments-popup.php and comments.php.


Step 4: WordPress tags


WordPress offers numerous intrinsic functions that one can leverage to add basic functionalities onto your WordPress theme. This do not requires the developer to deal with complex HTML codes. All you need to do is to just incorporate inbuilt functions of WordPress into your theme files and incorporate the requisite functionality to get your job done.


Step 5: Make it functional


As we have now completed the task of creating and activating a theme, you can get to see the complete benefit of your WordPress CMS platform. For those who wish to get any other functionality in their website, or alter a functionality that already you need to just install a plugin or can use the WordPress dashboard to alter the existing structure.


Saturday, 2 April 2016

What's In A Store Of WordPress 4.5 Version?


WordPress 4.5, is the next upcoming version of WordPress that is already in development phase and is targeted  to release in the month of April 2016 that is already been set by WordPress team. According to the update, in the month of February 24, 2016, WordPress version 4.5 Beta 1 has been released in the market  and is now accessible to users to download for the purpose of testing.  We just got to see the latest release of WordPress 4.4 with its latest security as well as maintenance version of WordPress 4.4.1 that was released earlier. Working with WordPress alteration process needs an immoderate hard work to make it function in proper ways

Coming to the core development team that has published a brief project agenda referencing the release of WordPress version 4.5 in the month of April 2016; but, according to the WordPress team, the current target release date version 4.5 of WordPress is April 12, 2016. The beta version 1 of WordPress 4.5 is currently scheduled to release by the end of February 2017, and it is great news to know that its three more beta versions are in sync in the releasing process.


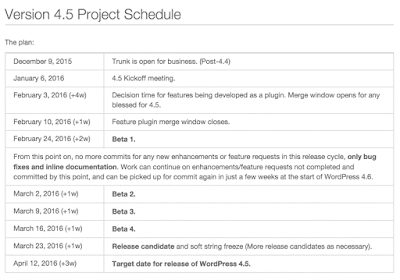
Below here is given a planned chart that defines the project schedule for WordPress version 4.5.


Mike Schroder, who is known for WordPress core developer is handling  the release lead for the WordPress version 4.5 and will be well helped by two other release assistants: Mel Choyce and Adam Silverstein. The project schedule that is presented above clearly defines that all new enhancements as well as feature requests  of WordPress version 4.5 definitely needs to be added by the release of Beta 1 version.

All the latest WordPress features are initially prepared as a plug-in and are efficiently managed to be merged properly in the core over the course of alteration stage. There are surely ample of WordPress 4.5 features, but there are few features that are worth mentioning that are implemented to be worked on and surely has made it to discussions in the opening meeting that comprises the following list:
  • Betterments with the theme customizer section that includes features such as customize pane resizer tool and customize device preview panel.
  • Enhancement of Post Editing process and Publishing activity
  • Fixing up of image compression process in the core sector
  • Enhancement of HTTPs to fix integrated content sections

Well, apart from above improvement plans of WordPress, I feel that there are various other updated features that are currently taken forward as plug-ins and already offers am exciting look to users. They are:

Two-Factor Authentication mode
 
Background Image Cropper – Enables easy cropping of all types of background images in the Customizer section that are quite similar to header images.

Next we proceed to discuss about Shiny update features that help WordPress users to – remove every ugly scraps of updating plug-ins as well as themes. 


WP Toolbar Experiments are defined as essential UX adjustment properties to the WordPress toolbar. 

WordPress REST API version 2 is defined as one of the complete version of WordPress REST API section.

There are more to happen that touches various reinforced image compressions, HTTPs enhancements and the Two-Factor Authentication system for WordPress.

I hope this latest article about the release of WordPress version 4.5, will fetch you with enough idea that will discuss about all new and latest features of WordPress that will be added to this version. So, what kind of features are you expecting in WordPress 4.5 version?  Please share your comments here.

Monday, 18 January 2016

WordPress 4.5 is expected to release in April 2016

WordPress, the world's most popular blogging software is supposed to give a great surprise this new year. According to, WordPress-ism a new version 4.5 of WordPress will be released in mid of April 2016. Mike Schroder, the WordPress core developer, will be the release lead along with Mel Choyce and Adam Silverstein.

Bloggers, Writers, and WordPress Developers must have already checked the latest security and maintenance version WordPress 4.4.1 which was announced officially via WordPress blog on 6th January 2016. Now let's wait for the next surprise!

You can experience the beta-1 version of WordPress 4.5 in February itself, and  three more beta versions are expected to be released before the final release candidate. 

Check out the chart showing the project schedule for WordPress version 4.5.


The few essential features that are expected shall be: 

1. Improvements with customizer that shall include customize pane resizer and customize device preview.
2. Improvements in post edit and publishing process.
3. Improvements in core compression of images.
4. HTTPs improvements to fix mixed content.

According to the project schedule for 4.5 version, new enhancements and feature requests will need to be added by the release of Beta 1 version. All the new features will be first worked on as plugins and will be decided to merge in the core over the course of development.

The call for feature plugins is beginning early, this time, around and a Feature
Plugin chat is scheduled for Tuesday, January 12, 2016, 3:00 PM CST. The main
purpose of the early chat is for plugins that believe they are ready for merge, and to start up new ones for future releases. Those who have ideas and plugins to put forward will have an opportunity to get feedback from other contributors.

Additionally, some new features, which are currently used as Plugins are: 

- Two-Factor Authentication for WordPress
- Background Image Cropper– It will enable cropping of background images in the Customizer, similar to the header images.
 - Shiny Updates – It removes the ugly bits of updating plugins and themes.
- WP Toolbar Experiments– some potential UX changes to the WordPress toolbar.
- WordPress REST API (Version 2)

Now let's see what how will the team maintain momentum and how 4.5 version will be executed according to the project scheduled.